Monday, March 9, 2015

Monday, February 23, 2015
JOURNALISM: Anton Owens on Family Traditions
"Paper Christmas Games: A Holiday Tradition"
By Drew McCall
Tuesday, February 10, 2015
Maya Modeling: 3-D Animation Projects
3-D Animation Projects
By Drew McCall
Howdy!
Ya miss me? It's been a while, but I've kept busy since my last post.
In fact, I've learned a lot since I've started working with Maya. Some of my previous posts are included in here, but there are plenty of new ones with the tools used described here.
HAMMERS
CUT FACE/ EXTRUDE/ BEVEL


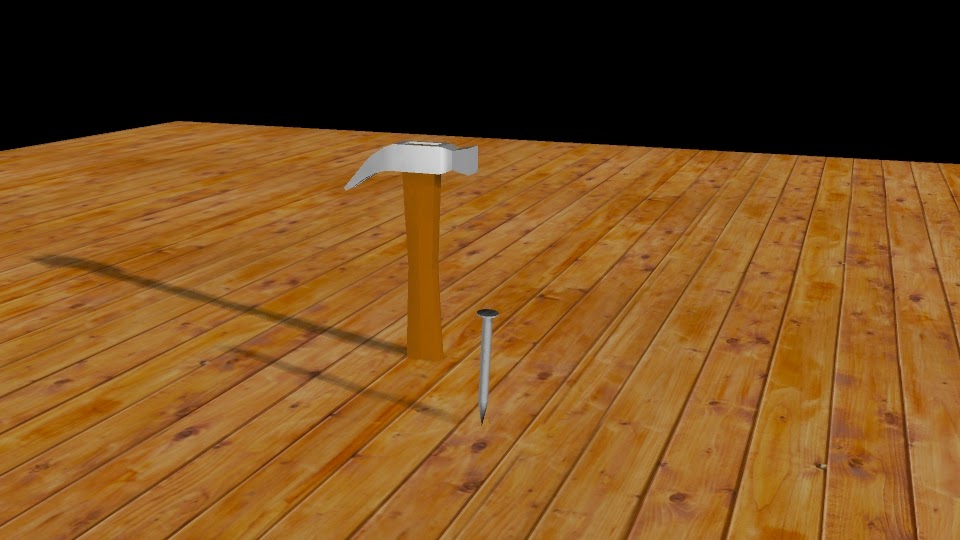
Cool hammers, amiright?
I liked making this, but making the tongs was pretty hard. In order to make them, we had to use the cut faces tool to cut the back of the hammer in half and separate the halves by shifting the vertices. The extrude was used make the head of the hammer, and again the vertices were also shifted to make the handle. The nail was made by adding subdivisions and scaling them. This was a fun project to do, and now I know how to make a hammer. So, yeah.
BOWL/ GLASS
NURBS/ CURVE/ REVOLVE

Although "NURBS" may sound like an insult, it is in fact a tool used to create original shapes other than polygons. In order to create these vessels, I had to create a NURBS curve - kind of like a profile of the shape - and use the revolve tool to create the final product. Then I added a transparent texture to make the wineglass and added a clay texture to make the terra cotta pot. I rendered the image using Mental Ray, which adds a reflection in the phong and blinn textures.
POLY..........THING
LIGHT

It's a thing!
I seriously have no idea what it is, but it's well lit, right?
I made this by creating some polygons (as in spheres) and using the difference tool which carved out the original sphere into the shape shown. But most importantly, I lit the scene using a three-point lighting scheme. I used directional lights mostly, and adjusted the light strength and the shadows.
SHAKER
CUVES-CIRCLE/ LOFTING

I'm sorry. I didn't animate any pizza to go along with this.
I think that this is one of my better 3D animation projects since the mental ray that I used turned out so well, and a lot of care also went into creating the lights. Originally we were told by our teacher to make salt and pepper shakers, but I wanted to give myself a bit of a challenge and create parmesan and red pepper shakers, which have a distinct curved shape. In order to create the original shape of the shakers I used the circle NURBS curves tool (LOL it rhymes) which creates a skeleton with which I later used the lofting tool to create the final shape. After altering the vertices to make the curve look natural, I began working on the lid. The lid is in fact a sphere that I scaled down and "differenced" to make the holes. I added some textures and lighting, and I rendered out the image via mental ray and badda-boom badda-bing: you've got yourself some high quality pizzeria shakers!
BOUNCE
KEYFRAMES/ GRAPH EDITOR
Ever seen a bowling ball bounce?
I have.
And you're about to see one bounce if you press the play button.
This was the first project that I actually animated using keyframes and the graph editor. The actual create of the balls was simple: They're just spheres that have been textured. The hard part came in when we had to time out the keyframes to make the bouncing appear realistic. We edited the height in the graph editor, and imported the rendered images into After Effects.
ICE CREAM
BUMP MAPS, LOOPING MOVIE
I scream, you scream, we all scream.
Wednesday, December 17, 2014
MINIMART: An After Effects Character Animation
"MiniMart"
It's 3 AM in the inner city.
For sleepy old Greg Ormansen, this is his 9-5.
For Markis Ricardo, this is chance to pay back his loan shark.
By Drew McCall
It's been a while since my last blog post because my E-Comm teachers (whom require that I turn in my assignments on this blog) have changed what they want in the posts as far as content goes. The posts will likely be way more "in depth" now and go "into the details" of the project, whatever that means.
Anyway, let's talk about white gangsters that drive astro vans.

The purpose of this project was to exercise our abilities using After Effects for 2D animation. We had to draw the characters, scan them, color them in photoshop, rig them in after effects, and animate them.
What's that?
Sounds easy, you say?
Obviously you've never used after effects before.
Like all films (good and bad), I started by outlining the story.
Most ideas for my work either come from exploring a concept that I find interesting (as is the case with Carl, a script I came up with after thinking about imaginary friends; the film itself is about an imaginary friend coming to terms with the fact that he doesn't exist), or out of necessity. In the writer's room it's important to accept ideas even if they aren't good, because they can sometimes lead you to a fantastic idea. I actually created this project several months ago when I didn't exercise this technique as much, but since I'm just now updating my blog post I thought I should include it.
itcame up with the idea after thinking about making a movie about a robbery. After considering options for the story, I decided to make it about mistaken identity, where the robber is mistaken for a person applying for a job. I was unsure how to tell the story without them talking, but after some research, I found a program that was capable of animating mouth movements called papagayo. I used it to animate the mouths only, everything else was made in after effects. I recorded my brother's voice for the character's voices and edited in iMovie. It took a very long time to make, hence the reason why I am late on posting this.


What's that?
Sounds easy, you say?
Obviously you've never used after effects before.
Like all films (good and bad), I started by outlining the story.
Most ideas for my work either come from exploring a concept that I find interesting (as is the case with Carl, a script I came up with after thinking about imaginary friends; the film itself is about an imaginary friend coming to terms with the fact that he doesn't exist), or out of necessity. In the writer's room it's important to accept ideas even if they aren't good, because they can sometimes lead you to a fantastic idea. I actually created this project several months ago when I didn't exercise this technique as much, but since I'm just now updating my blog post I thought I should include it.
If you don't mind, here's a quick tangent about storytelling:
itcame up with the idea after thinking about making a movie about a robbery. After considering options for the story, I decided to make it about mistaken identity, where the robber is mistaken for a person applying for a job. I was unsure how to tell the story without them talking, but after some research, I found a program that was capable of animating mouth movements called papagayo. I used it to animate the mouths only, everything else was made in after effects. I recorded my brother's voice for the character's voices and edited in iMovie. It took a very long time to make, hence the reason why I am late on posting this.


Next time, I would definitely take the time to draw out all of the backgrounds, because I used pictures off of the internet for the backgrounds inside of the minimart. I did, however, like using the software to animate the mouths. If I ever need to quickly animate mouths, I will definitely use that software again. I really liked this project and am happy with the final product. Plus, I think it's pretty funny, too.
Monday, December 15, 2014
Tuesday, December 2, 2014
Maya: 3-D (MC) Hammer Model
Hammer
By Drew McCall

These are hammers.

Why Hammers, you may ask?
Well, as it turns out, hammers can be very difficult when modeling in maya. Modeling hammers actually helps a lot when you are learning to model in a 3D modeling software.
The point of the project was to learn about making an object look realistic by altering the shape of polygon primitives. In order to make these hammers we had to form polygon primitives and shape the vertices and faces to make the shape of the tongs, then the hammer head, then the handle. Next, we had to color and texture the hammer, then finally, we had to light the scene with a 3-point lighting rig. After we were all finished modeling the scene, we had to render out several different views of it.
 If I were to do this again I would probably put more time into setting up the lights, because the key light is a little too bright and casts too dark of a shadow. I think that my hammer is realistic, though, and that's the important part.
"I Want You Back" J-5 Music Video Post
JACKSON 5 MUSIC VIDEO BLOG
By Drew McCall
Keeping with the theme of the new blogpost requirements, I am reposting the last video project I posted and I will go far more in-depth about the inception of the project and how we carried it out.
So here goes.
The purpose of the project was to create a music video using the 6-shot sequence, and we could choose any song we liked and tell any story we thought fit. My group spent some time trying to figure out what song we should do, but eventually settled on the Jackson 5's "I Want You Back" (partly because we liked the music but also because the song itself already gave us a hint as to the story we should tell). So based on the lyrics, we began to formulate an idea of this high-school student that had some history with this girl that he loved madly, but try as he may, cannot win her heart back. That is until she reads his love letter to her that proves he really does have feelings for her. In the end, they become a happy couple again.
This was not a very difficult project in pre-production compared to post-production. While filming was a fairly long but easy process, we ended up filming too much video to include it all in the video the way we would have liked to. The part in the video where our protagonist tries to buy his girl's love was far to long. For my longer version, I tried to keep all of the shots in the video by adding transitions to make the shots fit the length of the song. While this technique worked, it made it look a little too weird and confusing. After showing it to a peer, she said the transitions made sense, but gave her a headache when she watched it. For my second, shorter video, however, I cut all of the extra shots completely, leaving only a scene where he tries to give her a rose which she throws away. I think this was good, but I still would have liked to have included all of the original shots.
In all, I liked this project but I definitely will remember to go lighter when I'm shooting the footage and only film the necessary shots. I will also be sure to make sure that I will be able to tell the entire story that I want to tell with the given time constraints of the song. This project was an exercise in editing creativity, and I think I passed... But just barely!
Subscribe to:
Posts (Atom)