Showing posts with label Animation. Show all posts

Tuesday, May 19, 2015

Animation Final: B-Movie

ANIMATION FINAL:

"ATTACK OF THE 100 FT. DUDE"

By Drew McCall


Well, this is it. The project. 

The BIG project.

It's the final animation of the school year.

I'm not happy that it's the last one, I love this class and am sad that I'm leaving. But I thought I should end the school year with a bang. That's right. A special effects kind of bang.

Our prompt for the final was to create a video that includes 3D animation, special effects and green screen elements. My group, which includes myself, Graham Petter and Valhalla Cartwright, decided to create a film in the style of a 1950's Sci-Fi B-movie. 1950's Science fiction movies are renowned for their horrible quality special effects, poor acting, and low budgets, all of which we had plenty of. We thought it only natural for this to be our final project. Eventually, we settled on creating a film about a man that drinks a growth serum created by a mad scientist and then becomes 100 feet tall. This is a parody of ALL B-Movies from the 1950's, but we also stole the title from "Attack of the 50 Ft. Woman". We called ours, "Attack of the 100 ft. Dude".

This project was LOADS of fun to make from start to finish. However, it was not without its fair share of difficulty. One of the harder things that we encountered when making this project was designing it to be as close to an actual 1950's B-Movie as possible. To do this visually, we made all of the clips black and white, added a grainy effect to them in After Effects, and added the hum of a projector in the background.

The good thing about making a B-Movie like ours is that you can make it as terrible as you want it to be, since its poor quality is specific to the genre. We purposefully tried to make it as cheesy and bad as possible (which, I'm not gonna lie, helped us out due to time constraints). Our storyline was very rough and had many plots holes but we did this on purpose to make as awful as we possibly could. We still put in a lot of work in despite our film's bad quality; we had to plan out what shots we wanted and still had tell a story, even though it was all a parody. Graham helped a lot in the creation of our story and pre-production, and he also served as the star of our film. We put a lot of time and energy into making this whole film. We worked especially hard on the opening sequence, which included several detail-oriented tasks.

The title sequence is made up of several different parts: first we made the MGM studio title, then we had a film countdown, then we finally had the actual title sequence. The MGM studio title was created as a joke since I played the lion in our school's production of "The Wizard of Oz", so I made myself the "MGM" lion. I began in Photoshop by taking the original MGM logo and adding a black and white effect and erasing the original Lion and making the inside of the circle transparent. I then changed "Metro Goldwyn Mayer" to "Valtro Grahamwyn Maycall", as a parody of MGM using the names of everyone in our group. I then imported the footage of me as the lion and layered it beneath the now, "VGM" layer in After effects. Ta-da! Instant studio title card.


We then created the actual title sequence in photoshop and After Effects. The background of the title sequence was stock footage of a skyscraper that we found online, but everything else was made by us in photoshop and animated in After effects. We tried to make this title card as close to a 1950's title card as well, complete with a roman numeral date at the bottom of the screen alongside various other notes and disclaimers and a little E-Comm title and logo. These details really helped make the beginning pop.

We spent a couple days filming all of the footage we needed for the various scenes like the lab, Graham as a giant, and the tank/ missile. We really had to plan out what shots we needed to get, and had to keep in mind what we would have to do in post-production to get the intended effect as well. The lab scene was fairly straightforward, but the scenes we filmed on a green screen had to be really thought out. We captured a lot of footage but ended up using only a little bit of it to create the final product. To make Graham appear to be as tall as a skyscraper, we had to film him against the green screen pretending to ravage the city. Then, we pulled the footage into after effects and used the "Keylight 1.2" tool to key out the green parts and make the background transparent. We added a black and white effect to the footage of Graham and layered the background footage into our composition. The final product made it appear as though Graham was towering over the school building.


Val created the tank and the missile in Maya, and we pulled the rendered footage from Maya into After effects. We then added the black and white effect (again) and made it look like a tank fired a missile at Graham to shrink him down to a normal size.

When we were editing it all together in After effects, we really had to search for music and sound effects. A simple search in youtube for "1950's B-Movie Soundtrack" sufficed, and after a short period of searching I found everything I needed. We did the same with sound effects, and we even included Godzilla's roar and the "Wilhelm Scream" in parts of the film.

In all, this project was all about the details. Even though the quality decreases as the film goes on, the details that really make a good parody were the priority overall. The one thing that I would do differently in this project is I would apply one filter for the black and white/ grain effects to overlay across the entire project instead of adding these effects to each clip one at a time. I really loved this project, though, and I think we did a pretty good job capturing the whole idea of a B-Movie. I want to add some changes to the original file to make the audio better towards the end, but like most animations, it's never truly complete. It can always be changed to be made better.
I learned a lot though this project and experienced first-hand one of the most important aspects of animation as mentioned earlier: the details are important. Never be afraid to look for something that seems off in an animation, no matter how small, and go about fixing it. It will make the final product far better, and your perfectionism will be rewarded. I'd like to take a moment to thank everyone that helped me with this project and to you, the reader, for appreciating all my hard work over the year(s). Thank you for everything, it's been an amazing ride.

Now, without further ado, here's Grahamzilla destroying the city.


Tuesday, February 10, 2015

Maya Modeling: 3-D Animation Projects


3-D Animation Projects

By Drew McCall


Howdy!

Ya miss me? It's been a while, but I've kept busy since my last post.

In fact, I've learned a lot since I've started working with Maya. Some of my previous posts are included in here, but there are plenty of new ones with the tools used described here.

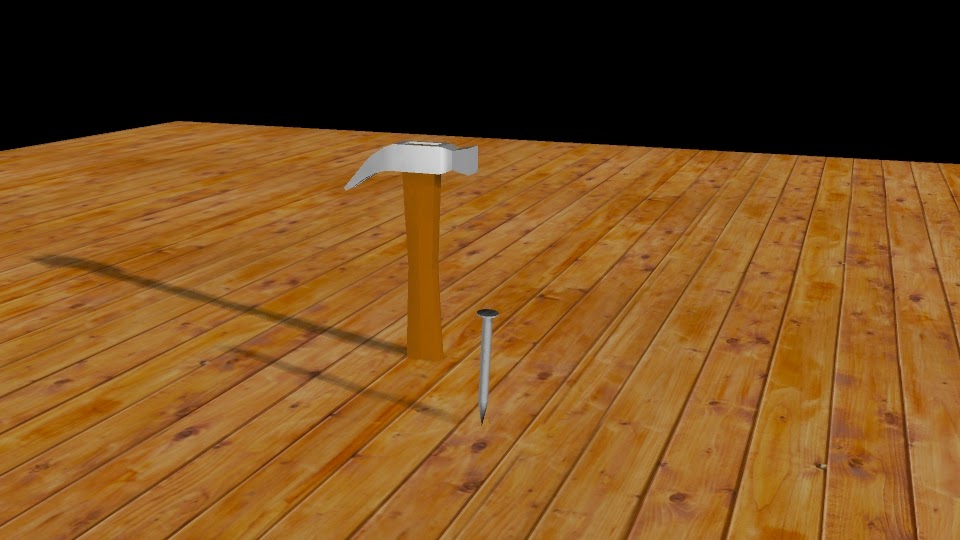
HAMMERS

CUT FACE/ EXTRUDE/ BEVEL


Cool hammers, amiright?
I liked making this, but making the tongs was pretty hard. In order to make them, we had to use the cut faces tool to cut the back of the hammer in half and separate the halves by shifting the vertices. The extrude was used make the head of the hammer, and again the vertices were also shifted to make the handle. The nail was made by adding subdivisions and scaling them. This was a fun project to do, and now I know how to make a hammer. So, yeah.


BOWL/ GLASS

NURBS/ CURVE/ REVOLVE


Although "NURBS" may sound like an insult, it is in fact a tool used to create original shapes other than polygons. In order to create these vessels, I had to create a NURBS curve - kind of like a profile of the shape - and use the revolve tool to create the final product. Then I added a transparent texture to make the wineglass and added a clay texture to make the terra cotta pot. I rendered the image using Mental Ray, which adds a reflection in the phong and blinn textures.

POLY..........THING

LIGHT


It's a thing!
I seriously have no idea what it is, but it's well lit, right?
I made this by creating some polygons (as in spheres)  and using the difference tool which carved out the original sphere into the shape shown. But most importantly, I lit the scene using a three-point lighting scheme. I used directional lights mostly, and adjusted the light strength and the shadows.

SHAKER

CUVES-CIRCLE/ LOFTING


I'm sorry. I didn't animate any pizza to go along with this.
I think that this is one of my better 3D animation projects since the mental ray that I used turned out so well, and a lot of care also went into creating the lights. Originally we were told by our teacher to make salt and pepper shakers, but I wanted to give myself a bit of a challenge and create parmesan and red pepper shakers, which have a distinct curved shape. In order to create the original shape of the shakers I used the circle NURBS curves tool (LOL it rhymes) which creates a skeleton with which I later used the lofting tool to create the final shape. After altering the vertices to make the curve look natural, I began working on the lid. The lid is in fact a sphere that I scaled down and "differenced" to make the holes. I added some textures and lighting, and I rendered out the image via mental ray and badda-boom badda-bing: you've got yourself some high quality pizzeria shakers!

BOUNCE

KEYFRAMES/ GRAPH EDITOR


Ever seen a bowling ball bounce?
I have.
And you're about to see one bounce if you press the play button.
This was the first project that I actually animated using keyframes and the graph editor. The actual create of the balls was simple: They're just spheres that have been textured. The hard part came in when we had to time out the keyframes to make the bouncing appear realistic. We edited the height in the graph editor, and imported the rendered images into After Effects. 

ICE CREAM

BUMP MAPS, LOOPING MOVIE


I scream, you scream, we all scream. 

Wednesday, December 17, 2014

MINIMART: An After Effects Character Animation


"MiniMart"


It's 3 AM in the inner city. 
For sleepy old Greg Ormansen, this is his 9-5. 
For Markis Ricardo, this is chance to pay back his loan shark.

By Drew McCall


It's been a while since my last blog post because my E-Comm teachers (whom require that I turn in my assignments on this blog) have changed what they want in the posts as far as content goes. The posts will likely be way more "in depth" now and go "into the details" of the project, whatever that means.

Anyway, let's talk about white gangsters that drive astro vans.


The purpose of this project was to exercise our abilities using After Effects for 2D animation. We had to draw the characters, scan them, color them in photoshop, rig them in after effects, and animate them.
What's that?
Sounds easy, you say?
Obviously you've never used after effects before.

Like all films (good and bad), I started by outlining the story.
Most ideas for my work either come from exploring a concept that I find interesting (as is the case with Carl, a script I came up with after thinking about imaginary friends; the film itself is about an imaginary friend coming to terms with the fact that he doesn't exist), or out of necessity. In the writer's room it's important to accept ideas even if they aren't good, because they can sometimes lead you to a fantastic idea. I actually created this project several months ago when I didn't exercise this technique as much, but since I'm just now updating my blog post I thought I should include it.

If you don't mind, here's a quick tangent about storytelling:


 itcame up with the idea after thinking about making a movie about a robbery. After considering options for the story, I decided to make it about mistaken identity, where the robber is mistaken for a person applying for a job. I was unsure how  to tell the story without them talking, but after some research, I found a program that was capable of animating mouth movements called papagayo. I used it to animate the mouths only, everything else was made in after effects. I recorded my brother's voice for the character's voices and edited in iMovie. It took a very long time to make, hence the reason why I am late on posting this.


Next time, I would definitely take the time to draw out all of the backgrounds, because I used pictures off of the internet for the backgrounds inside of the minimart. I did, however, like using the software to animate the mouths. If I ever need to quickly animate mouths, I will definitely use that software again. I really liked this project and am happy with the final product. Plus, I think it's pretty funny, too.

Tuesday, December 2, 2014

Maya: 3-D (MC) Hammer Model


Hammer


By Drew McCall


These are hammers.


Why Hammers, you may ask?

Well, as it turns out, hammers can be very difficult when modeling in maya. Modeling hammers actually helps a lot when you are learning to model in a 3D modeling software.

The point of the project was to learn about making an object look realistic by altering the shape of polygon primitives. In order to make these hammers we had to form polygon primitives and shape the vertices and faces to make the shape of the tongs, then the hammer head, then the handle. Next, we had to color and texture the hammer, then finally, we had to light the scene with a 3-point lighting rig. After we were all finished modeling the scene, we had to render out several different views of it.

If I were to do this again I would probably put more time into setting up the lights, because the key light is a little too bright and casts too dark of a shadow. I think that my hammer is realistic, though, and that's the important part.


Thursday, October 9, 2014

The Plausible Impossible: Animation Theory


THE PLAUSIBLE IMPOSSIBLE


By Drew McCall


In this project, we had to choose 5 moments from one of the supplied cartoons and list a series of "plausible impossibles". Plausible Impossibles are instances where something is impossible under the circumstances, but is made to appear possible to the audience. Below are some examples from a Disney "Gus Goose" cartoon.


EXHIBIT 'A': CHAIR MOTION

In the cartoon, Gus Goose arrives at Donald Duck's house and rushes in after smelling the delicious spread of food that Donald has prepared to eat. He rushes in so fast, that the chair rocks back and forth extremely quickly (like a spring) before it stops. This is a plausible impossible because it is plausible to rock back and forth in a chair like he did, however it is impossible for the chair to rock back and forth like this simply by running into it fast. The chair also does not behave like a spring, such as the cartoon suggests.


EXHIBIT 'B': SANDWICH CARDS

After sitting down, Gus goose then begins to eat. He takes two tall stacks of bread and bologna and begins to 'shuffle' them in order to make a sandwich. It is plausible to "shuffle" the bread and bologna if you TRY, but they will by no means behave like a deck of cards, and shuffling them would not make a sound similar to a deck of cards shuffling. This is therefore a plausible impossible.


EXHIBIT 'C': ACCORDION NECK

Gus Goose then takes the sandwich that he just created and eats it. This causes his neck to elongate upward, and causes his neck to take the shape of an accordion, and even make the sound of an accordion. This may seem plausible because the sandwich is so very large that it may seem as though his neck will take the shape of it once the sandwich is inside, but this is impossible because his neck is unable to get longer or change shape in real life. His neck also cannot make the sound of an accordion simply because he ate a sandwich. Once again, this is considered a plausible impossible.


EXHIBIT 'D': PASTA SOCK

After seeing a heaping plate of spaghetti, Gus Goose then takes out a pair of knitting needles and gets to work knitting the noodles into a sock, which he then slurps down as though the entire sock was made out of one enormous noodle. While it may be plausible to create a single long spaghetti noodle and make pasta out of it, it is preposterous to think that he would be able to knit the noodle into a sock and then slurp it down the way Gus Goose did. This is yet another example of a plausible impossible.


EXHIBIT 'E': COFFEE AND BREAD

After getting irritated with Gus Goose eating all of his food, Donald Duck tries to calm his nerves by pouring himself a cup of coffee, with which Gus Goose promptly sticks a baguette into. The baguette then appears to soak up ALL of Donald's in a matter of a few seconds. It is definitely possible to have bread soak up a drink like coffee, plenty of people do this every day. But it is impossible to have a piece of bread soak up ALL of the coffee in a coffee mug and still retain its shape. It is also impossible to think that the bread would be able to soak all of it up in just a few short seconds. This makes this instance another plausible impossible.


These are just a few examples of plausible impossibles that I saw during the first minutes of this cartoon. Plausible impossibles are things that many audiences take for granted in cartoons, they are part of what makes cartoons so enjoyable. Plausible impossibles are everywhere in the cartoon world, and being aware of them is a necessary part of being a successful animator.


Thursday, September 25, 2014

REAL LIFE SASQUATCH SIGHTING! (Or, 'After Effects Multiplane Animation')


RETURN OF THE 'SQUATCH


Multiplane Animation

By Drew McCall


This is a completely legitimate Sasquatch sighting.


In this project, we chose a location in which we would create a 3D effect in a 2D animation. The idea behind it is that the farther away an object is from the viewer, the slower it appears to move as the viewer moves, while the things closest to the viewer move faster. Using the multilane (or rather, multilayer) technique in photoshop, we created this effect by animating the closest layers faster than the farthest layers. In this project I learned that this technique can make an otherwise mediocre animation look professional. It actually wasn't very difficult to do, in my opinion. All you really had to do was keep track of which layers are closest and which are farther away. I really enjoyed this project because very cool effects can be created by using this very simple technique.

Monday, September 15, 2014

Capt.' Ironside: A Voyage Across the Seven Seas of Character Design


The Ballad of Captain Ironside


(Or, Character Animation 101)


By Drew McCall


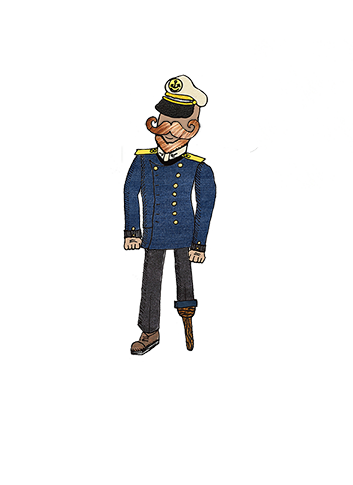
This is Captain J. Mortimer Ironside...


This character is one that I drew on paper, scanned into photoshop, and animated in After Effects. This was a very time consuming process, which took a lot of patience while both animating and editing the original drawing. The original drawing, by the way, looked like this:


I chose this sea captain mainly because I liked the idea of having sea captain named 'Ol' Ironside'.


After assigning layers to each of the body parts and adding some texture and color to it, it ended up looking like the character you see above. I wasn't done yet, though. I still had to animate it.
It took a while to create the background ship and sea, and I had to use the perspective tool to get the floor to look right. In the end I was very happy with the way it looked. I animated the legs and added a slight movement to the body to make the walk cycle seem a little more natural. I added a built in rain effect and... Presto! I was done. I liked this project, it took a lot of time and patience but the end result was really worth it.


Friday, September 5, 2014

2D Inchworm: Early After Effects Project


2D INCHWORM


By D. McCall


THIS IS A WORM.

Yeah, this isn't a very good project. It was fun to do, and I learned a lot, but you really should just move onto the other projects I have.

Thursday, September 4, 2014

3D Inchworm: EXTREMELY Basic Character Rigging in After Effects


3D INCHWORM TUTORIAL


By D. McCall


THIS IS A WORM.

After being instructed to by one Mr. Netterville, I completed the 3D Affter Effects inchworm tutorial posted on YouTube by a certain Australian animator whose name I am not familiar with. Nevertheless, the fruits of my hours and hours of hard labor are now posted for the world to see. Using the Puppet Pin tool, I was able to alter and shape the 3D inchworm to move just like an actual worm. I am happy with this final product.

Wednesday, August 27, 2014

Beginning of Sophomore Animation: Bouncing Balls Is Harder Than You Think

BOUNCE!


By D. McCall


This Project is a bouncing ball.


As simple as it may sound, it is actually a very time consuming and labor intensive project for such a 

simple product. At first, I started with the lower video, created in photoshop. It's pretty plain, without 

any squash or stretch attributes. Photoshop is NOT an ideal platform for making animations of any 

kind, so an animation like this is as expected. The animation on top, however, was created in Adobe 

After Effects, which is the perfect program for making animations like this. So, with an added squash 

and stretch, paired with a bounce of the edge of the screen, it looks FAR better. In all, I enjoyed this 

project and am happy with the final product.